Are you into sublimation and looking for some tips? Here are 8 sublimation tips and tricks you can use to get the best results from sublimation.
Sublimation can be a rewarding experience but occasionally things don’t always turn out how you expect. Whether you’re having problems or just want to avoid common issues with sublimation these tricks can help.

Tips to Get the Best Results with Sublimation
Use the Right Supplies
In my experience, you get better results with the correct ink, paper, and blanks. It goes without saying to use sublimation ink but be sure to use sublimation ink specific to your sublimation printer.
If you convert your printer, you have to use compatible sublimation ink. There are many printing supply companies making ink. Be sure to get ink designed for your model. Some companies provide a color profile with their ink if it’s necessary.
Paper designed for sublimation has the best results. This is an example of why you should use sublimation paper:


On the left side is the enlarged text from an inkjet printer using plain copy paper. The right side is the same printer only with sublimation paper. If you move the slider you can see the difference paper makes.
This is why I don’t use plain printer paper for my sublimation prints. If you really want to save some money on paper at least use color printer paper. It’s much cheaper but won’t wick as much as ordinary paper.
Lastly, use the right blanks. Mugs from the dollar store don’t necessarily have a polymer coating. Ones from printing supply companies are specifically for sublimation. They have a coating safe for mugs and tumblers.
My best results are with 100% polyester fabric. If you use 85% polyester blend or less then your designs come out faded. A blend of 65% has a vintage look in my experience. Anything less is not recommended.
Blanks from print supply companies work best for your sublimation designs from what I’ve seen. If you want to use your own custom material you can spray on a polymer coating.
However, most spray on polymer coatings aren’t safe for shirts or mugs. They are fine for wood, metal, or ceramic materials for display purposes.
Printer Settings
These settings are found in the printer menu or in the print driver. They are set in the printing preferences menu when you print. Or you can look through the menus in the control panel.
In order to get the best results from your sublimation printer here are the recommendations:
- Best print quality
- Vivid colors (unless image has skin tones)
- Matte paper
- Increase drying time
- Disable fast printing mode/speed priority
- Economy mode set to off
- Keep scale at 100%
Each printer is different but the idea is to get the most ink on the sublimation paper. This produces the best colors for transfers in my experience.
Another tip is avoid using Airprint or Mopria print drivers. They have few settings. If you want more control over how your prints turn out then install the full print driver.
You have some color management with Epson and Brother print drivers. Sawgrass uses a print manager which has most of the settings. However you can set the defaults in printer preferences:
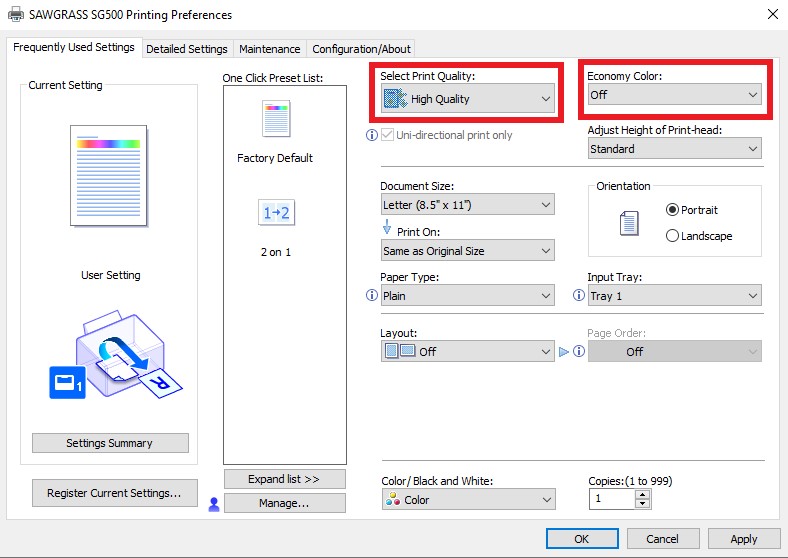
Preparing your blank
For best results use a lint brush on fabric to remove stray fibers. They can cause faint white lines on the finished material.
Also, use your heat press to remove any moisture from your material. Moisture causes tiny white dots in your design. I’ve found pre pressing the material for 5-10 seconds removes any moisture.
You don’t need to wash new material. However, even new blanks tend to have a few stray fibers and moisture in my experience.
For rigid materials avoid cleaning them with anything that leaves a residue. Alcohol and lint free wipes are best.
Tricks to Avoid Common Issues with Sublimation
Faded colors
If you want to avoid washed out colors here are the most common causes:
- Sublimation ink – newly converted printers need to fully flush out any standard ink in the system. Sublimation ink also has a shelf life of 2 years. Old ink won’t be as vibrant.
- Blank not suitable – fabric blends of 65% polyester look faded. Mugs or tumblers that lack a proper polymer coating won’t sublimate well either.
- Time, temperature, or pressure – mostly too much pressure. But if any of those are too much or too little it can effect how well your sublimation turns out. Each blank has an optimal time, temperature, and pressure.
Banding
This is commonly caused by a clogged nozzle on your printer. If your printer has a nozzle check or alignment page print them on plain paper before printing your design on sublimation paper.

If you see any banding do a print head cleaning or print some test pages to flush out the nozzles. It may take several attempts to clean the nozzles.
Ghosting
A double image or ghosting is caused when the sublimation paper moves in your heat press. Be sure to use heat tape to secure your design.
Also remove any gaps between the sublimation paper and your blank before pressing. Any gaps allow the sublimation paper to shift in your heat press.
Blurry
If your image turns out blurry it can be caused by two things:
- Enlarging images when printing – don’t rely on your printer to enlarge a design. You should use a design program to do any enlarging.
- Sublimation paper shifts in the heat press – use heat tape to secure your transfer.
- Too much time or temperature – It’s not as common but if either of these are too high it can cause blurring.
Smudges, dark spots
Extra ink on your sublimation paper causes smudges or small dots. Be sure to look close after printing your design. Any extra ink shows on your transferred design so use heat tape to cover any smudges.
Ink builds up on the rollers and print head inside any inkjet printer. If you print a few blank pages of plain paper this can remove any stray ink.
Best Practices
It’s a good idea to keep a log book with your printer or heat press. You can keep track of printer settings that worked with certain projects. Or heat press settings for different blanks.
For most blanks, setting your heat press for one minute at 400 degrees works best. Sometimes an extra 5 seconds helps with heavier materials. Or 10 degrees lower for thinner material works better.
As for pressure, it’s usually better to err on the side of less pressure. Too much pressure doesn’t help and can cause issues.
Trim or tear excess paper around your design to avoid leaving paper marks. You can eliminate them by pressing the item again for a few seconds. Be sure to remove the transfer though!
For most designs, setting your printer to vivid colors works best. If you’re printing photos of people vivid colors tends to oversaturate the colors.
Setting the color temperature to cooler (under 5500) removes redness and increasing it eliminates grey looking photos. Increasing the brightness slightly helps too.
It’s always a good idea to calibrate your monitors:
- Windows – Settings -> System -> Display -> Advanced display settings -> Display adapter properties for display x -> Color management tab -> Color management -> Advanced tab -> Calibrate monitor. Follow the instructions.
- Mac – System Preferences -> Displays -> Select Color tab -> Calibrate. Follow the instructions.
Lastly, don’t throw away mistakes. You can use them for test runs. Or possibly sublimate another darker design to cover or fix the error.
Sublimation has some trial and error to it so don’t be too quick to give up!
Sublimation Project Ideas
FAQ
Your blank may not have enough polyester or polymer coating. Too much pressure in your heat press can also cause this. Your time or temperature may not be correct for your blank.
Yes. Too much time, temperature, or pressure won’t improve the quality. In fact too much can cause poor quality sublimation.
It should be ready immediately after printing.
You should remove the items while they’re still hot. This avoids any unwanted marks or ghosting on your blanks.
Technically yes. But it will be very dull and faded.
Yes. You just need a barrier to protect your heat press platens. Or to prevent any sublimation ink bleeding through to the backs of any garments.
If it’s faded all over you may not be using a tumbler specifically for sublimation. Not all tumblers have the right polymer coating. If it’s faded in certain areas be sure to eliminate gaps. Your design should be pulled tight against the tumbler before going in the heat press.
Too much heat. Possibly too much time. Reduce your heat by 10 degrees. Your sublimation paper shouldn’t be scorched.

The Copier Guy, aka Dave. I’ve worked on scanners, printers, copiers, and faxes over 23 years. When I’m not fixing them I’m writing about them. Although, I’m probably better at fixing them. I’ve worked with every major brand. As well as several types of processes. If it uses paper I’ve probably worked on one.